OFFICIAL MANUAL / GETTING STARTED

Shadowrocket Tutorial:
Import, connect, and test

Using the iPhone and iPad interface, follow five steps to connect for the first time. Check that your details are complete before adjusting rules, and confirm the result at each step.

Subscribe Global Routing Connectivity Test

Suggested order: Work through the steps from the beginning for a first-time setup. If you can connect but some requests behave unexpectedly, go directly to testing and troubleshooting. Screenshots help identify interface elements; the fields on your device may differ.

STEP 01 / ADD SERVER

Add a server or import a Subscribe subscription

A subscription provides an updateable set of server details; an individual server requires you to enter each field. Choose one method rather than adding the same details twice.

Have a subscription link? Choose Subscribe

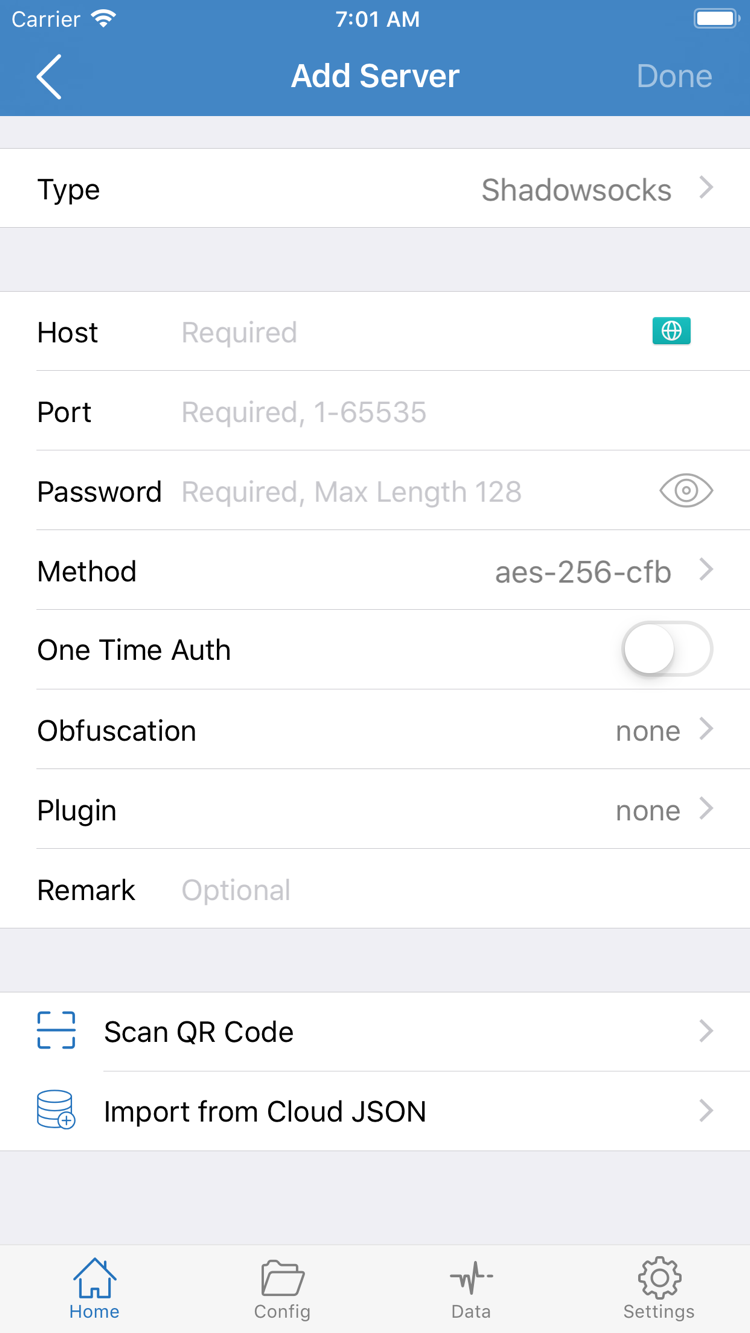
Open Home at the bottom of the screen, find Add Server in the SERVER section or tap the add control at the top right, then open Add Server. Tap Type, choose Subscribe, and enter the complete subscription link from your service provider in URL. The name is just for your reference, so you can label it by purpose. URL, not the name, determines whether the content can be retrieved.

After pasting, check the beginning, end, and middle of the link for extra spaces or line breaks. Some links include query parameters, which are part of the address; do not copy only the domain or remove a long-looking suffix. After saving, return to Home and wait for the subscription to load, then expand its group to check for server entries. If the app reports a retrieval failure, check the link or your current network first. Do not repeatedly create subscriptions with the same name.

Have details for one server? Enter the fields for its Type

Start from Add Server, but choose the protocol specified in your details for Type, not Subscribe. Then enter Host, Port, and the required Password, Method, or other authentication fields for that protocol. Do not guess parameters from a screenshot: the fields vary by Type, and a field shown in a screenshot is not necessarily required for every protocol. Additional options such as TLS and SNI should also match the details from your service provider.

If you have a usable QR code, you can scan it with Scan QR Code, then check the imported details. Import from Cloud JSON is only for cases where you already have details in the corresponding format. Do not put an ordinary subscription link into an incompatible import option. After entering details manually, save them and return to SERVER to check the entry. Future connections use the saved server, not unsaved content in the editing screen.

This step is complete when a selectable server appears in Home and its entry shows the expected Type and address. A subscription group name without any server entries is not enough to proceed to connection testing. For field definitions, see the glossary; for retrieval issues, see troubleshooting.

Official Shadowrocket Add Server screenshot showing Type, Host, Port, Password, Method, and import options at the bottom
Add Server: choose a Type first, then enter its corresponding fields. The field combination in this screenshot is not a set of server details for your use.
STEP 02 / GLOBAL ROUTING

Choose a Global Routing mode

The server determines where the connection goes; Global Routing determines how requests are handled. These are separate settings, so check the routing mode after choosing a server.

First, distinguish Config, Proxy, and Direct

Return to Home and tap Global Routing to open the options. Config uses the rules in the current configuration file to determine how requests are handled. Proxy routes eligible requests through the proxy path and is useful for short comparison tests. Direct uses a direct path, so turning on the switch at the top does not mean requests will necessarily go through the selected server. These modes are not speed settings, and they do not fix incorrect authentication details.

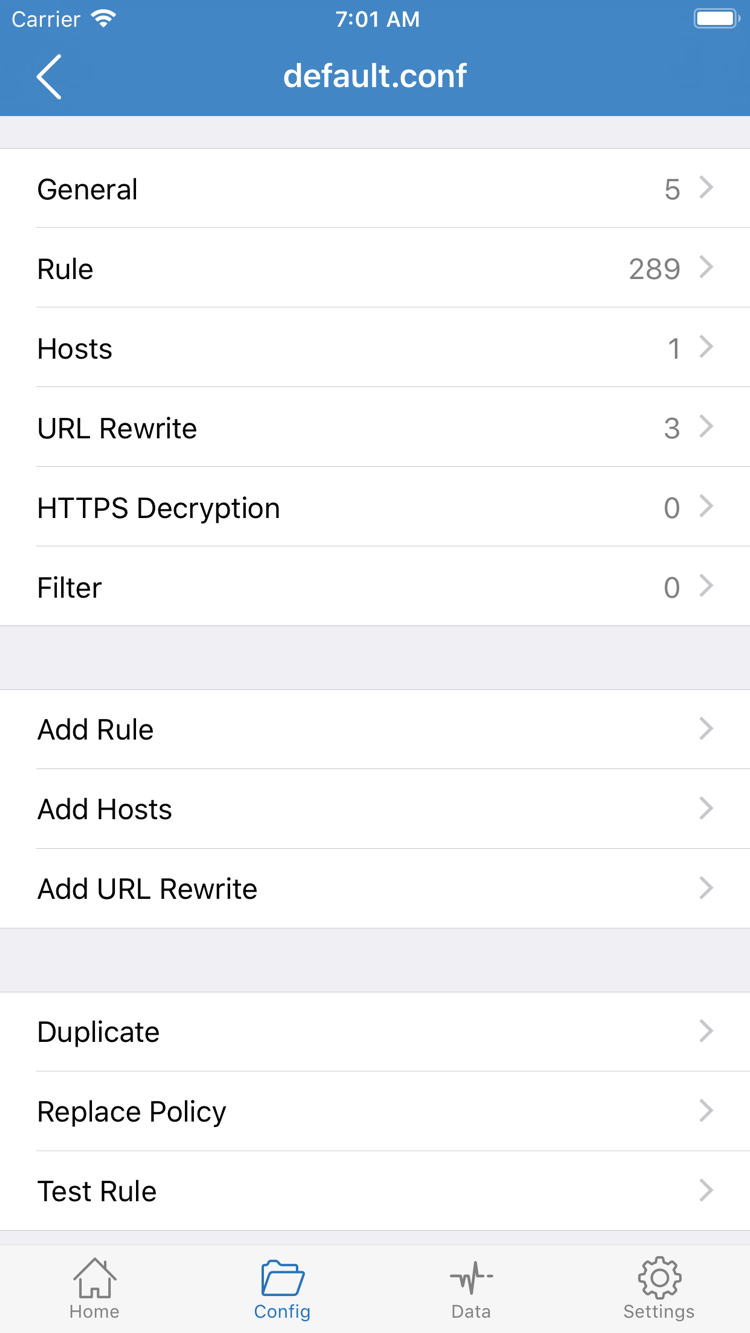
To use rules, choose Config, then open Config at the bottom and confirm that the required configuration file is selected. If there are multiple files, importing a new one does not automatically make it the active configuration; check which file is actually selected. The file editor contains sections such as General, Rule, Hosts, URL Rewrite, and HTTPS Decryption. You do not need to edit each section or enable every feature for a first connection.

Check rule order instead of changing the whole configuration

Rules in Rule are generally matched in order, with specific conditions before fallback conditions. The example below illustrates the syntax: example.com and its subdomains match PROXY, the specified local network range matches DIRECT, and FINAL handles the remaining requests. The policy names in your actual configuration must exist; rule text without a corresponding policy does not confirm that the connection is ready. Do not replace an existing configuration just to copy this example.

DOMAIN-SUFFIX,example.com,PROXY
IP-CIDR,192.168.0.0/16,DIRECT
FINAL,DIRECT

If you are unsure whether the server or the rules are causing a problem, note the original mode, switch temporarily to Proxy, then connect and test before switching back to Config for comparison. If Proxy works but Config fails, focus on the rules and policies. If both fail, check the server and underlying network first. Keep changes limited during initial setup; changing the subscription, configuration, and DNS at the same time makes results difficult to compare.

Official Shadowrocket Config screenshot showing General, Rule, Hosts, URL Rewrite, and HTTPS Decryption sections, plus Add Rule
Config editor: this step is mainly about confirming the selected configuration and understanding Rule. You do not need to edit every section.
STEP 03 / HOME

Select a default server and connect

Choose the server you intend to use before turning on the switch. Opening an entry for editing and selecting a default server are two different actions.

Check the selected server in SERVER

Return from Config to Home, find the server you just imported in the SERVER group, and tap the circle to its left. Confirm that the selection indicator has moved to the target entry. If tapping the name opens the editing screen, return to the list and check the selection there. If your subscription contains multiple servers, stick with one for this test so changing servers each time does not make results hard to compare.

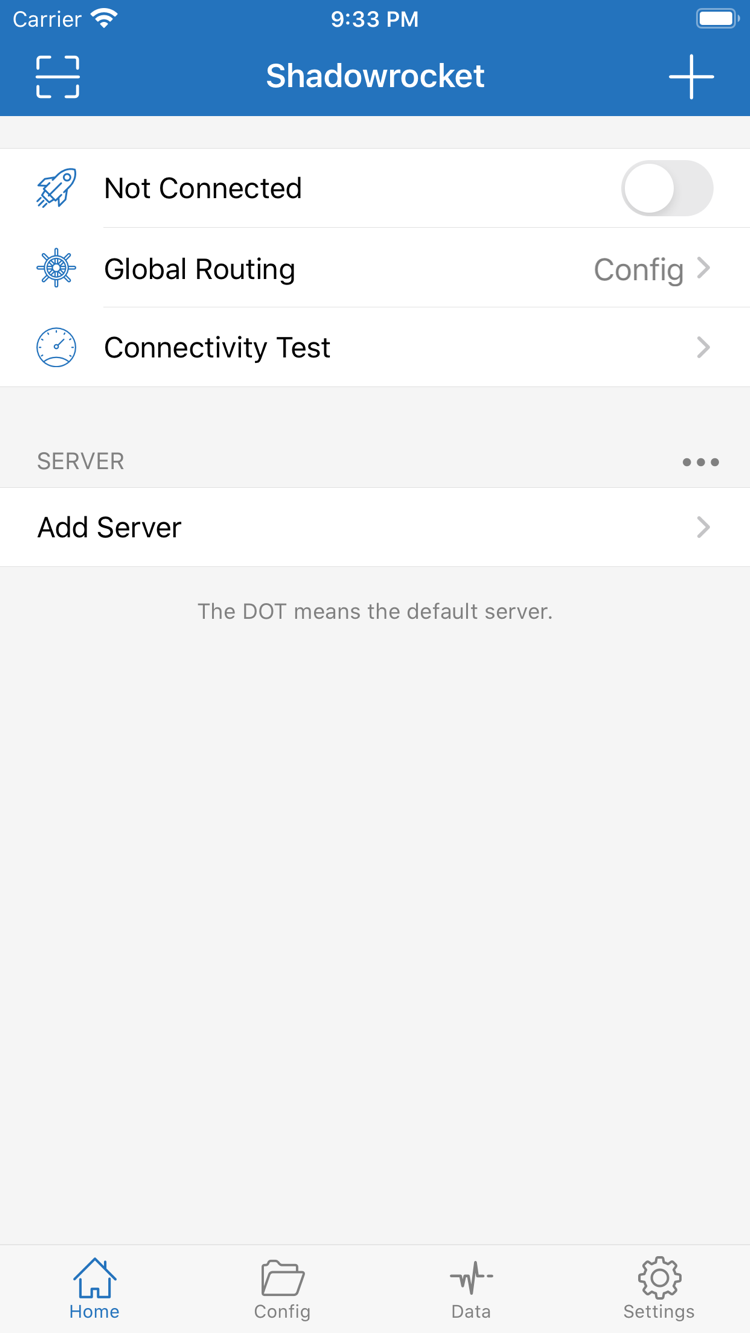
Check Global Routing in Home again to confirm it matches the mode you chose in the previous step, then turn on the connection switch at the top. The first time you connect, the system may ask for permission to add a VPN configuration. Review the prompt, confirm that the request comes from Shadowrocket, allow it, and complete any device verification required by the system. If you deny authorization, the server entry remains, but this connection cannot be established. When you try again, check the authorization result instead of entering all server details again.

Connection status is the first check, not the final result

Return to Home and check whether the top of the screen still shows Not Connected or has changed to a connected state. If the switch turns off immediately, stop retrying and note the message. Check whether another VPN connection is already active on the system. During initial troubleshooting, keep only one connection source active to avoid two configurations taking over. Do not troubleshoot by deleting system configurations you do not recognize; managed devices may also have administrator restrictions.

A switch that stays on means the client has entered its connection state. It does not, by itself, confirm that remote authentication, domain resolution, and access to the target all work. Do not enable On Demand right away, or assume an automatic connection failure means the server is faulty. Keep the connection manual, run the next test, and access the target app. Consider automatic connection conditions only after the manual connection has been verified.

To disconnect, return to Home, turn off the switch at the top, and confirm the status changes. When you later change servers or edit important details, disconnect first, save the changes, then reconnect and test again. This makes it easier to identify when the new settings take effect and prevents results from an existing connection being mistaken for results from the new settings.

Official Shadowrocket Home screenshot showing the Not Connected switch at the top, Global Routing, Connectivity Test, SERVER, and Add Server
Home: check the selected server in SERVER, Global Routing, and the connection status at the top, then run Connectivity Test.
STEP 04 / CONNECTIVITY TEST

Check that it works: test and real requests

Check in this order: client status → test request → target app. Do not treat one test result as proof that the entire connection path works.

Run Connectivity Test

Keep the server and connection state you just selected, tap Connectivity Test in Home, and wait for the test to finish. First, check for a clear success or failure result; there is no need to compare values across servers. The result depends on the method, target, and current network. A successful test means the path used by that test was available, not that every app and domain will use the same path.

If the test fails, first check whether the current mode is Direct and whether the selected server is the one you expect. If needed, open Settings and check Test Method. Note the current selection before comparing it with another one. Do not repeatedly change methods just to get a successful result; it is more useful to relate the method, network, and actual access result.

Generate a new real request

Open the app or page you want to use, then refresh it or start a new request. An already-open page, cached content, or existing connection cannot reliably show whether the new settings are in effect. Return to Shadowrocket and check Data for an entry matching the time of your action. If rule and policy details are available, check what the target request actually matched rather than relying only on the switch state.

“The test passes but the target app fails” and “both the test and target app fail” are different problems. In the first case, check the target request's rules, DNS, and app behavior. In the second, check the server, authentication, and current network first. A page loading does not by itself prove that it went through a proxy, since Config may route that target through DIRECT.

STEP 05 / SETTINGS & DIAGNOSTICS

Troubleshoot by stage; change one setting at a time

First identify whether the issue occurs during import, connection, or requests. These are different stages and may require different checks.

Check the underlying network, then verify the import

Turn off the connection and first check that the device can access resources that normally work on its network. If the underlying network is unavailable, check Wi-Fi sign-in, cellular data permissions, or a disconnected network first. If a subscription cannot be retrieved, check that the URL is complete and that the subscription from your service provider is still valid. Do not submit the subscription link as a search term or share it publicly. If the import has not produced a server list, changing Global Routing will usually not fix the retrieval problem.

Handle an immediate disconnect differently from a timeout

If the switch turns off immediately, check system VPN authorization, the status of other VPN connections, and any device management restrictions. If the switch stays on but requests time out, check the current server's Host, Port, Type, and authentication fields, especially for spaces introduced when copying and pasting. If your service provider supplies multiple sets of connection details, do not combine an address from one set with authentication fields from another. Save any corrections, reconnect, and repeat the same test.

Only some requests fail? Check Config

If requests work in Proxy but not Config, return to Config and check which file is actually selected, then review the rule and policy matched by the failed request. Look for an overly broad DOMAIN-KEYWORD, a fallback rule placed too early, or a policy that points to the wrong server. Keep a copy of the original configuration and change one item before sending a new request. Do not route all requests through another mode indefinitely to fix a single target.

Use a manual connection first, then check Diagnostics

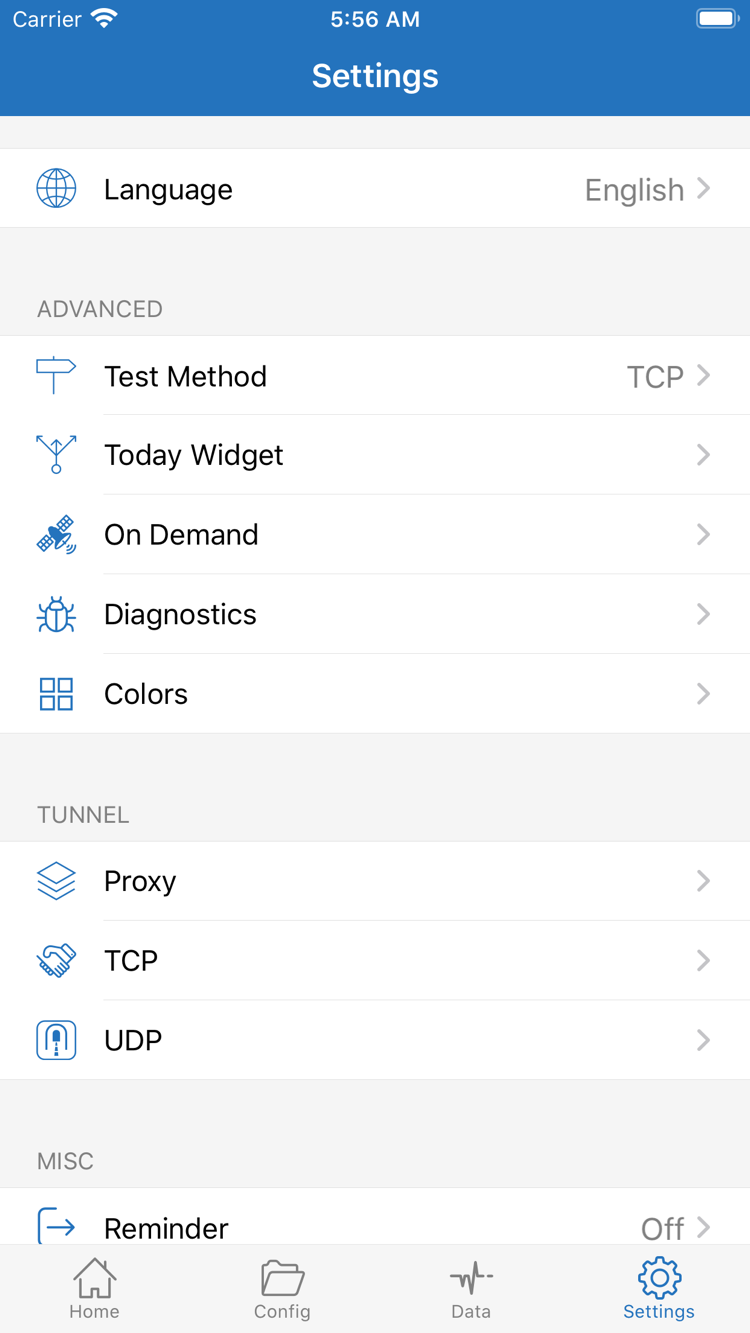
Check On Demand in Settings. For initial troubleshooting, turn off automatic triggers and keep the connection manual, so changes between Wi-Fi or networks are not mistaken for random disconnections. After the manual connection is stable, configure On Demand separately and test each trigger condition. Test Method helps interpret test results; Diagnostics provides diagnostic information. Avoid changing Proxy, TCP, UDP, and other settings as a group without a clear reason.

For further troubleshooting, note the exact error, the step where it occurred, network type, Global Routing mode, and whether the same issue affects every server. Before sharing Diagnostics or Data information, hide subscription links, authentication details, and unnecessary access records. For more troubleshooting branches, see troubleshooting; for interface terms and rule keywords, see the glossary. If the issue concerns App Store visibility, a purchase, or restoring a previous purchase, read the genuine purchase guide instead of changing connection settings again.
Official Shadowrocket Settings screenshot showing Language, Test Method, Today Widget, On Demand, Diagnostics, Proxy, TCP, and UDP
Settings: during troubleshooting, note Test Method, On Demand, and Diagnostics. Avoid changing several other options at once.